


Close your eyes. Picture me, running up the steps of the Philly Museum of Art, while “Eye of the Tiger” blares in the background. Did you do it? Because I am seriously feeling like we have conquered this kitchen.

Let me just fill you on on what we started with. (This is the photo from the listing when we were buying the house)

We had a black stove in a sea of white appliances and pretty much no color otherwise. The cabinet boxes were really sturdy but the doors felt flimsy. We weren’t loving it and it just wasn’t us.
From day one, we knew we needed to do something in here. Not only because we wanted it to reflect us, but because we know we aren’t going to be here forever. We knew we definitely had to up the kitchen’s game for resale purposes.
We did little things first, like replace the leaky faucet. We also swapped out the black stove/oven combo for a white version along with a matching dishwasher (that we got from John’s parent’s when they redid their kitchen, thanks!!). The black stove we had picked up by Habitat ReStore and the dishwasher got a new home with my parents! Our families are really good at sharing.
The next thing we tackled was the soffit. We took advantage of one of Ace’s Free Paint Friday’s and picked up a quart. We wanted to add just a little color up there, so this was the perfect sort of beachy green-blue. I even made this “antique” grocery sign to make it a little more “us”!
If you remember, back in February, we put up a backsplash! That made the biggest difference in the kitchen while keeping the wood cabinets. It really made it feel a little more modern!
After the little updates, we left it for a while so we could stew on what we really wanted to happen in there. We went back and forth between ripping out all of the cabinets or getting a new Ikea kitchen and just painting what we had. Neither seemed entirely appealing to us because a new kitchen would be expensive (new cabinets = getting new counters, sink, faucet, etc) and we weren’t in love with the structure of our doors (and painting seemed daunting).
Then, like a DIY genius, John had a vision. I was so totally skeptical about his vision, though. I really couldn’t visualize his plan. He told me he wanted to turn our cabinets into beadboard cabinets. His idea was to buy big sheets of beadboard and cut them to size to fit in the recessed panels of the doors. Even though I still wasn’t 100% convinced, I trusted that he could do it. It was decided. DIY beadboard cabinets, painted.
After doing A LOT of research about painting cabinets, we decided on using Benjamin Moore’s Advance paint in Simply White (for the main cabinets) and Silver Fog (for the island). We also used Kilz Premium primer. We (and by me I mean John & his dad) got started the week Christian was born. I sat on the couch and snuggled. Definitely a fair trade-off.
So, should we break this process down? We’ll start with how we did the cabinet doors.
To do this yourself, you will need:
4′ x 8′ sheets of beadboard (We bought this from Lowe’s, 2 @ $20 each)
Construction adhesive (we used Loctite Power Grab 1 tube @ $5)
Paintable Caulk (we used DAP Alex Plus 2 tubes @ $1.96 each)
Table Saw (or have them cut your beadboard down for you at the store)
Measuring Tape
Caulk Scraper
Paint brush or roller (We used 2 Wooster brushes {1.5″ @$11.99 & 2.5″ @$11.99})
Primer (We used Kilz Premium, 1 gallon @ $21)
Paint (We bought Benjamin Moore Advance {1 gallon of Simply White @ $49.99 and 1 quart of Silver Fog @ $23.99})
Spray paint or new cabinet hardware (We used Rustoleum Universal in Oil Rubbed Bronze @ $5.77)
Total for cabinet painting supplies (assuming you have a measuring tape and caulk scraper): $178.15
Total for our entire kitchen makeover so far (including the backsplash): $263.15
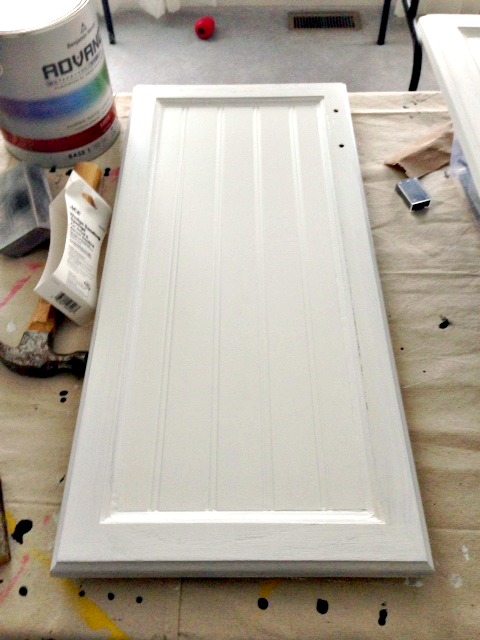
To start off, all of the upper doors came off and got a good Scotch-briting/sanding. John picked up our 4′ x 8′ sheets of beadboard and got to measuring (twice, probably more) and cutting (once!).
He made sure to cut the beadboard so it would be centered on the recessed portion of the cabinet door, with a stripe (for lack of a better word) as the center point. Then he covered the panel with construction adhesive and laid the beadboard into the recessed panel of the door.

He next used paintable caulk around the edge of the beadboard to give it a nice clean look. This is where a caulk scraper comes in handy.

After letting the caulk dry, there was a little clean up that needed to happen in the form of removing extra caulk. We were able to scrape a lot of it off with just our fingers but we also used a razor blade for the tricky stuff. You kind of just need to clean it up until you are happy with how it looks! Once that was done we could start painting! This is when the magic started to happen.

While the doors were getting work done, we also roughed up, primed and painted the boxes. My dad even got in on the action!


We chose to use a brush on everything. We switched between a 1.5″ Wooster brush and a 2.5″ Wooster brush. I preferred the 1.5″ when painting the beadboard side of the doors and the smaller portions of the boxes and I used the 2.5″ brush when painting the larger panels of the boxes and the backs of the doors. The paint leveled out really nicely which I was very happy about. I was a touch worried about having loads of brush strokes, but it ended up looking wonderful! I’m glad we forked over a little extra cash to get some great paint =]
For the hardware, we used what we had and painted it with Rustoleum Universal Metallic in oil rubbed bronze. I was pretty unsure about it until I got it all painted and put back up. Now I’m really loving it! Plus, it saved us boo koo bucks! We are at an impasse about what hardware to get for the drawers. I want knobs and John wants cup pulls. So, for now, they sit. But they look good doing it.
We took quite a break after finishing the upper cabinets. What, with getting used to having two kiddos and all. So just a few weeks ago, I got started on the island (which had already had a beadboard treatment from John.

I repeated all of the steps above for painting and John did the same for inserting the beadboard on the doors. We used the Benjamin Moore in Silver Fog for the island for a little contrast to all the white we would have going on. Loving it! It’s definitely reading a little more blue in the picture than it does in real life.

While we had the momentum going and our house was already a disaster of kitchen things spread everywhere, we got to working on the base cabinets. It took 2 coats of primer and 2 coats of paint to cover everything.
Now, we have a bright and shiny new kitchen! I can hardly believe it is the same space. But first, lets take a moment to remember what this kitchen started off as.
 And now…

It is so much lighter and brighter! I love walking in here every morning. I can even attest to the quality of the paint so far. It has had kale and watermelon juice splattered on it as well as spaghetti sauce and beer (while brewing). Even a few spots that I left overnight wiped up super easily! Oh, and Alex likes to crash his cars and trains into the island. A lot.

So, here we have ourselves a whole new look in our kitchen for under $300! It’s amazing what a little elbow grease can do for your home.
Anybody have any great tips for an easy kitchen upgrade? Painting Cabinets? Running around like Rocky?

